
What is a Webhook?
A webhook is a simple way for applications to communicate automatically based on events. Once set up, an application sends data whenever a specific event occurs.
You likely encounter webhooks daily without realizing it. For example, bank notifications: When a deposit is made, a webhook triggers and sends data to another application (on your phone), which then displays a notification.
Webhooks use HTTP, the same protocol that powers websites. Just as entering a URL in your browser fetches a webpage, webhooks send data to designated URLs in other applications.
How to Set Up a Connection
Step 1: Start with Zapier
Zapier is an automation tool that connects different apps and services, allowing them to work together through triggered actions—without requiring code. To begin:

- Create a Zapier account (if you don’t already have one).
- Start a new Zap and select the Built-in Webhooks tool.
- Choose Catch Raw Hook as the Triggering Event.
- This will generate a Webhook URL—think of this as the address where ActivityHero will send your registration info.
Step 2: Set Up the Webhook in ActivityHero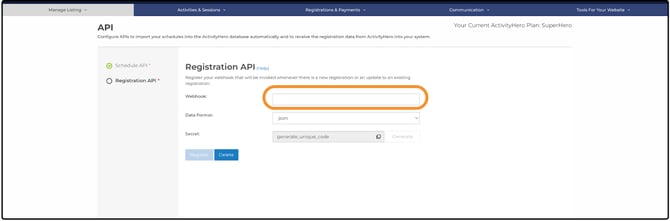
- Log in to your ActivityHero Dashboard.
- Navigate to Manage Listing > API.
- Select Registration API.
- In the Webhook field, paste the Webhook URL copied from Zapier.
- Click Register.
- No need to update Data Format or Secret.
Step 3: Test the Connection

- Click Test Webhook to expand the test options.
- You’ll see the Webhook URL and sample data from ActivityHero.
- Click Send to simulate receiving a new registration.
- Return to Zapier and click Test Trigger.
- This checks for the test data sent from ActivityHero.
- If successful, a new request will appear in the list—click on it to review the data. You can also verify the test data in ActivityHero to confirm accuracy.
- Click Continue with Selected Record once everything looks good.
Step 4: Connect Zapier to an Application
Now, choose the application where ActivityHero registration data will be sent. This could be HubSpot, Google Sheets, or any other Zapier-compatible app.

- Select the application (e.g., HubSpot).
- Choose an Action Event (e.g., Add Contact to List).
- Click Sign In under Account, enter your app credentials, and give Zapier any permissions needed to access that app.
- Click Continue and customize the data fields based on your needs.
- Required fields are marked with a red asterisk (*).
- Click Continue, then select Test Step.
- This simulates how the application will process data from ActivityHero.
- Check your application (e.g., HubSpot) to ensure the data appears as expected.
- If needed, click Retest Step to adjust how data is processed.
- Click Publish to complete the setup.
Step 5: Automate Your Workflow
Once setup is complete, each new registration in ActivityHero will automatically trigger the Zap and send the data to your chosen application.
Now your automation is live! 🎉
Contact support@activityhero.com if you have questions or problems.