

You will receive an email from ActivityHero prompting you to complete the connection process. Simply click Start Connecting in the email to begin.
Verify

To receive a verification code, click Send Verification Code. Check your email for the code, then enter it in the window that appears and click Verify.
Before Getting Started

Please complete the following steps before installing the plugin:
- Download the Plugin File
Ensure that the PowerSchool Plugin .zip file is downloaded to your computer. If you received the file via email, save it to a known location on your system. - Check PowerSchool Version
Make sure your PowerSchool version is 20.11 or higher. You can check this on your PowerSchool login screen.
Note: If the screenshots below don’t look like your version of PowerSchool, review the plugin installation instructions for older versions of PowerSchool (skip to PAGE 8).
Installing the Automated Rostering Plugin
Step 1: Access Plugin Configuration
- Log in to PowerSchool as an Administrator.
- From the left-hand navigation, go to System Management → Server → Plugin Configuration.
Step 2: Upload and Install the Plugin

- In the Plugin Management Dashboard, click the Install button.
- On the Plugin Install page, click Choose File and select the plugin .zip file from your computer.
- Once the file path appears in the field, click Install.
If successful, you’ll be redirected to the Plugin Management Dashboard and see a green success message.
Step 3: Enable the Plugin

- In the Plugin Management Dashboard, locate the installed plugin and check the Enable box.
- A window will slide in from the right. Review the Data Access Requests, then click the Enable button.
🔒 The plugin requests access to specific tables and fields in PowerSchool.
Step 4: Configure the Plugin

- From the Plugin Management Dashboard, click the name of the plugin to access its Summary Page.
- On the Summary Page, click Data Provider Configuration.
Step 5: Locate and Copy OAuth Credentials

- On the Data Provider Configuration page, locate the OAuth Credentials, which include your Client ID and Client Secret.
🛠 If an Additional Configuration section appears follow the below instructions:
- Set Access Level for v1 APIs to Read Access
- Set Maximum Page Size to 100
- Click Submit
Step 6: Complete the Web Form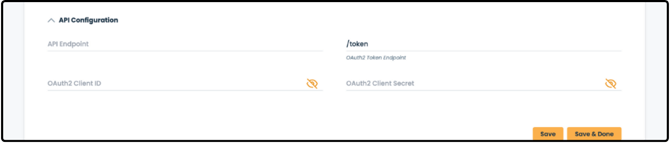
- Open the secure web form from our email link. Under the PowerSchool Connection section, enter the following:
- OAuth2 Client ID
- OAuth2 Client Secret
- API Endpoint (typically the PowerSchool login URL, e.g., https://yourdistrict.powerschool.com, or https://powerschool.yourdistrict.com )